Wednesday, October 26, 2011

Jars signed with mutliple code signing certificates?

For anyone that has built and maintained Web Start applications, you have probably been through this issue before.   Your QA group or worse yet, a customer, calls to tell you that they cannot start your application because the download failed because "jar resources in jnlp are not signed by the same certificate".

If want your Web Start application to have full access permissions, then you need to sign all the jars that get downloaded.  This generally presents the opportunity to encounter one of the following errors:
  1. None of the jars are signed.  Most likely a build issue and generally only happens once, (I hope!)
  2. Single jar is not signed.  Again, most likely either a build or process error.
  3. Not all jars signed with the same certificate.
The first two are easy to resolve.  The last is a bit of a pain because Web Start doesn't bother to tell you exactly which jars where signed with different code signing certificates.  Now, it's time to make some educated guesses as to what changed recently and look at the most likely/usual suspects.   Another option is to get the list of download jars from the JNLP document and figure out which certificates(s) each jar has been signed with.

We have been through this at work once or twice and so I finally decided to make it easier for the next time this happens.   The approach I took was to read all the jars in a deployment folder, open them and look for the signature files inside the jar file.   For the results, I created a map keyed by the jar name and the value being a list of the signature file names (*.RSA, where the * represents our code signing certificate alias).  Keeping a list in the map allows for cases where a jar may have multiple signature files, which was encountered when we switched over code signing certificates.  Writing this in Java would be possible, but why write so much code? Why not write a script in Groovy, it would be some much shorter and concise.

Groovy Script
def dir = new File("C:\\MyDeployment\\jboss\\myserver\\deploy\\myserver.ear")
def jars = dir.list( { d, f-> f ==~ /.*.jar/ } as FilenameFilter)
def map = [:]
jars.each() {
   def zipFile = new java.util.zip.ZipFile(new File(dir, it)) 
   zipFile.entries().each { zipEntry ->
      if (zipEntry.name.endsWith('.RSA')) {
          if (map.containsKey(it)) {
             def list = map[it]
             list << zipEntry.name
          } else {
             map[it] = [zipEntry.name]
          }
      }
   }  
}
map.each{ println it}

Hope this helps!

Thursday, September 29, 2011

Lessons learned from recent PA/DSS audit

The following are some tips/hints and lessons learned during our recent PA/DSS audit.   Everyone's mileage will vary. 

Our application runs on both Windows and Linux.   We support JBoss and Weblogic for the application server.  We support Oracle, SQL Server and  MySQL for the database.  We have three client applications which are all WebStart clients, so this is NOT a web application.  Our EJBs are EJB 2.1 Session Beans.

Hints
  • Determine exact software stacks needed including all software levels, build levels and whatever else you need.  Collect all of this in one safe place.
  • Get the hardware ready and any scripts that may be needed to use those devices.  Our application is a POS, so we had a collection of pin pads that we were required to test with during the audit.
  • Get any utility software needed
    • Ghost for Win* images (or Win 7 provides a Backup/Restore feature)
      • We ran into some problems with Windows Server 2008 and had to use one of the  Acronis tools to create the backup image.
    • PartImage for Linux images
    • Darik's Boot and Nuke
    • anything else you might need
  • Wipe the hard drives before loading any software, including the OS, using Darik's Boot and Nuke to be absolutely sure that the drive does contain anything that might match a credit/debit card number.
  • Install the OS and any 'base' software, which isn't the software to be verified by the audit
    • Keep the partition sizes as small as possible without causing disk output problems.  The larger the disk, the longer the forensic scans will take to run.
    • On Windows - you can have a page file, just don't allow it to grow and shrink.   Set the min and max file size to the same value.   
      • Problem here is that if card holder data is written to the page file then later the page file size is shrunk, some of that card holder data MAY be inside freespace, which is NOT cleaned up by the OS.   This can cause some instances of card holder data to be found during a forensic scan and NO ONE wants card holder data found during the scans.
    • On Window - you should also set the Windows Update setting to be Notification because you don't want Windows Updates being applied to a machine during the audit.
    • Our auditor also recommended we turn off the Windows Restore points.  Again, you don't want Windows doing any extra work that could impact the audit results.
  • Take images of all boxes.  These may be needed to reset a machine back to a 'clean' state for ad additional set of tests.
  • Talk to each of your authorization providers
    • let them know when your audit is scheduled and ensure you will have connectivity to their test servers
    • Verify that each provider can supply 'magic authorization values' that will help your trigger the following responses:
      • approvals
      • declines
      • referrals
      • timeouts
      • void
      • split tenders
      • partial auths
    • If any of the authorization providers encrypt their communications, then you may need to ensure you have whatever is needed for that.   We needed to download and install the JCE .
    • If you support multiple authorization providers, you will have to run tests against each provider so be ready to do whatever it takes to switch your application from one provider to the next.
  • Practice taking images and restoring images on all boxes
    • The Linux tools are not as user friendly as the Windows tools, so you need to be ready and able to make and restore your images in a timely manner.
  • Now you can install your software and you should be ready for the audit.
  • If you do any testing before the auditor arrives, be ready to restore the machines back to a 'clean' state because you don't want to take a chance that your early testing wrote any card holder data somewhere on the hard drive.
  • Our auditor previously used WinHex to do the forensic scans.  We used the evaluation version to try and double-check ourselves.  The problem with that version is that it is slow and can only scan for one card number at a time.  This time the auditor had a new set of software for the scans and unfortunately I didn't get the name of the package, although I know it was a purchased product.
Good luck - hope this helps!

Wednesday, July 20, 2011

Book Review: Building and Testing with Gradle

Overview

Gradle is one of the new "cool kids on the block".  It  is quickly gaining momentum as projects like Hibernate and Spring migrate their build processes over to Gradle.   Gradle can be considered the 3rd generation of Java build tools, with Ant and Maven representing the earlier generations.

Gradle is built on top of Groovy, which provides the ability to define a Domain Specific Language (DSL).  In this case, the Gradle DSL provides a language tailored to the task of building code.  If the DSL does not provide exactly what you need, then you can extend the DSL using plug-ins.  It is possible to learn Gradle without knowing Groovy, but some initial knowledge of Groovy is beneficial.

This book is short (89 pages) .  It brings back memories of the O'Reilly "A Developer's Notebook" series.

Contents

Chapter 1, Hello Gradle  This chapter leads the reader thru the installation and configuration of Gradle and demonstrates the ubiquitous Hello World (build file) example.

Chapter 2, Gradle Tasks  This is the  best chapter in the book.  It drives home the concepts associated with a 'task' and how the tasks can be configured and customized.    The most helpful  suggestion in the book is found in this chapter.  The  recommendation is that you read the Gradle DSL documentation.  I had previously read the Gradle Users Guide but was still a bit fuzzy on what  the properties and methods were and how they were used. .   Reading the DSL documentation provides the full picture.  It also  helps drive home  that you are working with a programming language/DSL and not a set of XML tags like Ant and Maven.

Chapter 3, Ant and Gradle  This chapter compares and contrasts Ant and Gradle.  It also demonstrates that Gradle can run Ant tasks by importing an Ant build.xml or by using the Ant Builder that is part of the Groovy distribution.

Chapter 4, Maven and Gradle  This  is the longest chapter in the book comprising  about 25% of the book.  Like all of the Gradle documentation, this book re-assures the reader that any previous investment in Maven or Ivy will not be lost in a move to Gradle.   Gradle provides support for Ivy, Maven's Central repository and a local repository.

Chapter 5, Testing with Gradle  This chapter is a  good overview of using  JUnit , TestNG, Spock, Geb and EasyB.  Coverage of testing is a bit light given the title of this book. 

Chapter 6,  Multiproject Builds  This chapter  does a nice job of taking a sample project and showing three different approaches to creating the project build structure.  The approaches shown are one master build file, project-specific build files and a hybrid approach.  While the sample projects are very small, they provide the reader a starting point to converting their own multiproject builds.

Summary
This is an excellent book for getting started with Gradle.   There are plenty of working examples provided in the source code download package.   The authors do a very good job of explaining the concepts and presenting alternative ways of expressing the same options within the DSL.

One minor issue is that matching up the downloaded source examples to the examples in the printed chapters is a bit of an exercise because they are not organized in a folder structure by chapter like many other books.
  
Initially the slim size of the book worried me as to it's ability to provide a depth of coverage of Gradle, but the authors stated in the Preface that "Future volumes will cover the Gradle plug-in ecosystem, how to extend Gradle with your own business logic and even more advanced topics."    Sounds good to me, bring it on Tim and Matthew!


Wednesday, July 13, 2011

Gradle dependencies with jars that have no version number

I have seen presentations and read blogs and articles on Gradle. It sounds pretty good.  Gradle is gathering momentum as some of the major players in the open source community (Hibernate and Spring Security to name a few) have switched their builds over to using Gradle.  I figured it is time to give it a try.

The project I work on is fairly old, pre-Maven I suspect.  The project is a multi-layer, multi-component Java project built using Ant.  The project does not use Maven or Ivy.  The project includes a folder that contains all of our dependent jars. These jars are committed to SVN and included as part of the project when it is checked out. This way we have all the dependencies we need to build the project.  We have quite a few dependent jars that do not have version numbers in the jar name.  Examples include a copy of junit.jar and log4j.jar.  This all existed before I started working on the project, so I have no idea how it got that way - it just is.  And since it's not really broken, we haven't attempted to fix it!

Not having version numbers in the jars is a minor inconvienence.  If you read the Gradle User Guide chapter on Dependency Management, they seems to push dependency management for jars with version numbers.  Most of the examples shown in the documentation and elsewhere declare the dependencies as seen in Example 34.1 in Dependency Management chapter.  Great, but what do I do if I don't have version numbered jars in my dependencies?  I did not believe the Gradle guys would leave me hanging...  And they didn't!

I really wanted to figure out how to setup my classpath to include these jars without version numbers.  I figured out how to do this and started writing this blog.   Then as I re-read the Dependency Management chapter, I saw a clue that I must have blown right by the first time I read it.  The clue is in Section 34.3.5 File dependencies.  You can use the FileTree  to help define the classpath to include these non-versioned jars.

I created a small project called GradleTest that did not use the standard Java plugin conventions for the source and resource files and has dependencies in the "libs" folder, none of which have version numbers in the jar names.


I created two different options, which both seem to work.  The first is shown below.  This option handles the dependencies more specifically, assigning just the jars that are needed for either compile or runtime.

apply plugin: 'java'

sourceCompatibility = 1.6
version = '1.0'

sourceSets {
    main {
        java {
            srcDir 'src'
        }
        resources {
            srcDir 'resources'
        }
        compileClasspath += fileTree(dir: './libs', includes: ['**/log4j.jar'])
        runtimeClasspath = classes + sourceSets.main.classes + fileTree(dir: './libs', includes: ['**/log4j.jar'])
        
    }
    test {
        java {
            srcDir 'test'
        }
        resources {
            srcDir 'testresources'
        }
        compileClasspath += fileTree(dir: './libs', includes: ['**/junit.jar'])
        runtimeClasspath += classes + fileTree(dir: './libs', includes: ['**/junit.jar', '**/log4j.jar']) 
        
    }
}

sourceSets.main.classesDir = new File("./build/classes")
sourceSets.test.classesDir = new File("./build/classes")

The second option looks very similiar to the first option,  but uses the dependencies definition and it cheats by assigning all the jars in the "libs" folder to both the compile and runtime classpath, rather than just exactly what is needed.


apply plugin: 'java'

sourceCompatibility = 1.6
version = '1.0'

sourceSets {
    main {
        java {
            srcDir 'src'
        }
        resources {
            srcDir 'resources'
        }
        
    }
    test {
        java {
            srcDir 'test'
        }
        resources {
            srcDir 'testresources'
        }
        
    }
}

sourceSets.main.classesDir = new File("./build/classes")
sourceSets.test.classesDir = new File("./build/classes")

configurations {
    compile {
        description = 'compile classpath'
        transitive = true
    }
    runtime {
        extendsFrom compile
    }
}

dependencies {
    compile fileTree(dir: 'libs', include: '*.jar')
    runtime fileTree(dir: 'libs', include: '*.jar')

}

I am sure there are other,  possibly better or cleaner alternatives.  Please feel free to share improvements or other alternatives.   Hope this helps....

Thursday, May 19, 2011

Groovy vs Java difference provides a WTF moment

We all (should) know that not ALL Java is valid Groovy, but if you don't spend you day working in Groovy, then sometimes you forget these differences.   These 'gotchas' are documented here but who reads this stuff, right?  :-)

I wanted to get DatabaseMetadata for a database, specifically a list of table names, so I started with a copy of Java code that already did the same thing.

Class.forName(jdbcDriver);
Connection con = DriverManager.getConnection(jdbcURL, "root", "root");
DatabaseMetaData dbmd = con.getMetaData();
String[] tableTypes = { "TABLE" };
ResultSet allTables = dbmd.getTables(null, null, null, tableTypes);
System.out.println("processing tables...");
while (allTables.next()) {
    String table_name = allTables.getString("TABLE_NAME");
    System.out.println("processing table"+table_name);
}

Should be simple, right - drop the semi-colons and look for other opportunities to shorten the code using Groovy.

def db = Sql.newInstance('jdbc:mysql://127.0.0.1:3306/mydb', 'root', 'root', 'com.mysql.jdbc.Driver')
def metaData = db.getConnection().getMetaData()
println("Driver Name: " + metaData.getDriverName())
println("Database Product: " + metaData.getDatabaseProductName())
println("Driver Name: "+ metaData.getDriverName())
println("Driver Version: "+ metaData.getDriverVersion())
String[] tableTypes = { "TABLE" }
ResultSet allTables = metaData.getTables(null, null, null, tableTypes)
while (allTables.next()) {
    String table_name = allTables.getString("TABLE_NAME")
    println "processing table "+table_name
}

And it almost worked!   The thing that threw me was that not only does the code compile, but it also returns correct values for some of the methods in the DatabaseMetadata, but when it came time to iterate across the table names, there were none.  Come on, I just ran almost the exact code in Java and it spit out all the table names in my database.  What the heck did I mess up this time?

My error was the 3rd bullet on the list of gotchas from above - how NOT to initialize an array in Groovy...

String[] tableTypesJava = { "TABLE" }
String[] tableTypesGroovy = [ "TABLE" ]
println tableTypesJava.class
println tableTypesGroovy.class
assertEquals(tableTypesGroovy, tableTypesJava)  // this will fail!

Both variables say they are String[] but tableTypesJava is really closure when compiled in Groovy! The fix to the Groovy code is to use the brackets when initializing the array and not the braces - basically the tableTypesGroovy from above. Guess it's time to RTFM...

Hope this helps!

Monday, January 31, 2011

Grails AJAX Examples

Early on, newcomers to Grails encounter a lack of working samples accompanying the framework.  Good places for examples and documentation include the Grails documentation and bloggers.

Ajax is one of the features with built-in support by Grails.   Once people get their "head around" the Grails basics, they generally want to move onto more interesting features like Ajax.  This usually requires scouring the web, looking for examples and/or reading the documentation fairly closely.   I went through this process and figured that others might benefit from a set of short working ajax examples in Grails.  I have created a small application that demonstrates some of the Ajax features and provide the application for download to anyone interested. (see bottom for download information)

The example application uses each of the following:
  • FormRemote
  • RemoteLink
  • SubmitToRemote
  • RemoteFunction
  • RemoteField
 General Steps
  • Pick your javascript library - prototype used in my example. Also shown is some Ajax event registration.


     function showSpinner(visible) {
         $('spinner').style.display = visible ? "inline" : "none";
     }
     Ajax.Responders.register({
     onLoading: function() {
           showSpinner(true);
     },
     onComplete: function() {
     if(!Ajax.activeRequestCount) showSpinner(false);
     }
   });

  • Update your controller with any code needed - below is my entire BookController
  • package ajax
    
    class BookController {
    
         def scaffold = true
      
      def showEditAjax = {
       render (view:'editAjax', model:[bookInstance:Book.get(params.id)])
      }
      
      def showListSelect = {
       render (view:'listSelect', model:[bookInstanceList:Book.list()])
      }
      
      def showTitleSearch = {
       render (view:'titleSearchAjax')
      }
      
      def showRemoteLink = {
       render (view:'remoteLink', model:[bookInstanceList:Book.list()])
      }
      
      def showDetails = {
       render(template:'bookDetails', model:[bookInstance:Book.get(params.id)])
      }
      
      def showSearch = {
       render (view:'searchAjax')
      }
      
      def String wrapSearchParm(value) {
       '%'+value+'%'
      }
      
      def searchTitle = {
       def list = Book.findAllByTitleIlike(wrapSearchParm(params.searchvalue))
       render(template:'searchResults', model:[searchresults:list])
      }
      
      def search = {
       def list
       if (params.publisher && params.title)
        list = Book.findAllByTitleIlikeAndPublisherIlike(wrapSearchParm(params.title), wrapSearchParm(params.publisher))
       else if (params.publisher)
        list = Book.findAllByPublisherIlike(wrapSearchParm(params.publisher))
          else if (params.title)
           list = Book.findAllByTitleIlike(wrapSearchParm(params.title))
       
       render(template:'searchResults', model:[searchresults:list])
      }
      
      def listByPublisher = {
       def list
       if (params.filter.equals("All"))
        list = Book.list()
        else
          list = Book.findAllByPublisher(params.filter)
       
       render(template:'searchResults', model:[searchresults:list])
      }
      
     def update = {
      def bookInstance = Book.get( params.id )
      if(bookInstance) {
       bookInstance.properties = params
       if(!bookInstance.hasErrors() && bookInstance.save()) {
        render "
    

    Book ${params.title} updated with Ajax using FormRemote

    " } else { render(view:'edit',model:[bookInstance:bookInstance]) } } else { flash.message = "Book not found with id ${params.id}" redirect(action:edit,id:params.id) } } }
  • Create/update view(s) - See screen shots below and/or download the application
    Most of the examples are fairly straight forward and should not need a lot of explanation.  They may not be great 'real world' examples but the intention is to provide a working example for someone to start from.

    FormRemote
    The formRemote taglib creates a form tag that uses a remote uri to execute an ajax call.  In this case, I have slightly modified the default generated edit.gsp to change the form tag to a formRemote tag and added a div to show the edit results.   The screen shot below shows the result of first clicking the Form Remote navigation menu button, changing the number of pages in the 'Grails in Action' book and pressing the Update button at the bottom of the screen.


    RemoteLink
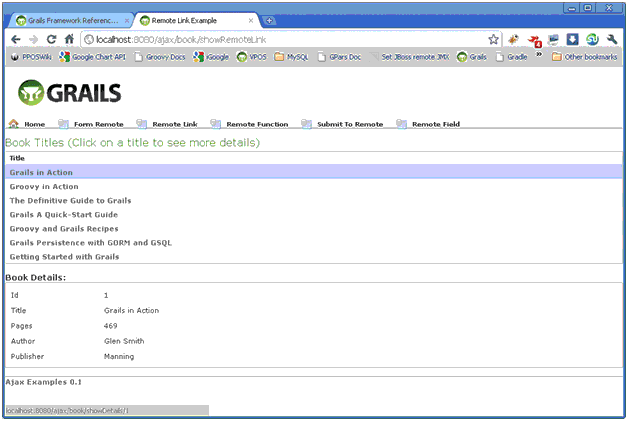
    The RemoteLink tag creates a link that calls a remote function when clicked.  In the example application,  I display a list of book titles and the title is a link.  Clicking on the title shows the book details at the bottom of the screen.
    
        ${fieldValue(bean: bookInstance, field: "title")}    


    SubmitToRemote
    The submitToRemote tag creates a button that submits the surrounding form as a remote Ajax call serializing the fields into parameters.  In the example application, I created search fields for Title and Publisher.  The search button was created using the SubmitToRemote taglib to submit the search parameters using Ajax.

    Title:
    Publisher:
    RemoteFunction
    The example application uses the RemoteFunction taglib to create a remote javascript function that is assigned to the onChange DOM event.  When the user selects or changes the value in the Publisher dropdown list, the remote function is called and the bottom half of the screen displays books published by the selected Publisher.


    RemoteField 
    The example application uses the RemoteField taglib to create a dynamic search for Book titles, similar to Google Instant.  Search results are returned the screen as you type values in the Title Search field.   The controller code in this case,  wraps the search parameter with the wild card character (%) to search the database and returns all matches to be displayed.


    Problems Encountered
    • I ran into problems trying to get the spinner to show correctly until I found this entry on StackOverflow that showed how to register the Ajax events.  When running locally on the same box, this happens very fast so you really need to keep and eye on the upper right corner of the screen if you want to see the spinner.
    • I also ran into problems with the RemoteFunction due to syntax problems.  Being used to the taglibs,  I was setting the update parameter using update="mydiv" when the syntax should have been update:"mydiv".  This did not flag as an error.  The controller was called, it just never updated the target div!
    Downloads
    It was fun putting this together.   Hope it helps some of you!